Sunday, July 28, 2013

DIY No Sew Hand Puppets!

Here's our hand puppets to go along with our DIY Puppet Theater we made a couple days ago. We hope you enjoy them as much as we do!!! I have a feeling it'll be another long night of shows...


Supplies
socks
assortment of felt
pompoms
buttons
glue gun/Elmer's craft glue
scissors
cardboard

*Elmer's craft glue and buttons not shown


Directions
Take your sock and cut a mouth piece. The picture below illustrates the length. From there you can cut up and/or down in a circular cut depending on how big you want it's mouth to be. Be careful not to cut the mouth too wide. I made this mistake and couldn't fit the cardboard into it's mouth (lengthwise). So definitely measure before you start cutting to make the mouth bigger.


Next, cut out a mouth piece from your cardboard.


We had a glue gun malfunction right in the middle of gluing, so if you have one, use it, but if you don't, Elmer's Craft Glue will do the job. Make sure it's the craft bond tacky glue.


Let it dry. After it's done drying, stick it through the bottom of the sock and up to the mouth opening. Line it up with the "lips" of the opening. It will overlap with the felt mouth piece you've glued together.


Get creative and add a tongue, teeth, or maybe even a lollipop! You can get creative with the eyes and accessories too! Our son chose buttons for his dino's eyes and our daughter chose felt eyes with pretty eye lashes :)


After your mouth piece is done drying, add the eyes. Our daughter wanted to add a heart nose, earrings, and a flower in her puppet's ear, but I didn't have a sewing kit to sew those on. So we just had to agree on adding a nose. 


Meet Princess Rosie...

(Princess Rosie's nose is missing in this picture, but you can see it on the first picture above)


And meet Rexy the T-Rex...


The day we made the DIY Puppet Theater, the kids refused to get out of it! It was passed 9pm when they finally agreed to come out. Now that they have puppets, I can only imagine what tonight will bring!! Literally hours of fun!


Saturday, July 27, 2013

Healthy No Bake Cake!

Have a child who can't eat cake for any reason? Or maybe you've got one like me who hates cake! My son is exactly like me-he's the one kid that will choose fruits over candy if put out in front of him. He wanted a different kind of cake for his birthday this year, so we decide on a watermelon cake! Let me show you how to make a cake that any child (or adult) will love! No baking required!!


Healthy No Bake Cake

Prep Time: 15 minutes
Cook Time: 0

Total Time: 15 minutes

Makes 8-12 slices


Ingredients
1 seedless watermelon
cool whip
strawberries
nectarines
tooth picks
granola crunchies (can also use sliced almonds)

Directions


With a sharp knife, cut the two ends off of your watermelon. Stand watermelon on one end and slice the peel off from end to end.


Before adding any "frosting" or toppings, make sure to soak up excess juice with a paper towel. If you forget this really important step, your "frosting" wont stay on. Add frosting and fruits.


You can really decorate this however you want. I wanted to do a border at the top and bottom with grapes, but I couldn't find any nice grapes. They were all mushy and we don't like mushy grapes. I also wanted to decorate the sides with sliced almonds, but I couldn't find those either. So I decided to use whatever I had at home, some granola crunchies. I sliced strawberries, but kept them connected at the top. I stuck them in the cake with tooth picks.


Now it's time to slice and enjoy!


 You can also pre-slice it before you put on the "frosting" and decorations. This will make it easy to pick up the pick, dry it off, dip it in the "frosting" then roll it into the sliced almonds. This will be the method I use the next time I make the cake. 


I hope you enjoy this cake as much as my boy did!!!


Friday, July 26, 2013

Farmer's Spaghetti with "Noodles"

NO CANS? NO PRESERVATIVES? NO PACKAGES? NO SODIUM?

Do you have any idea how much sodium is actually in one can of tomato sauce? While you are in the grocery store, you pick up the can and take a look at the back. You read the calories. You see a bunch of numbers. Then you pick up another can to compare. All looks the same. So now it comes to price. You make your choice, check out, go home and make dinner. This was my life. I took for granted those numbers that I'd look for at the back of the can. Honestly, I didn't even know what I was looking for. Your daily recommended intake of sodium is 1500mg, so what is just 20mg per serving? In one 8oz can of Hunts Tomato Sauce, there are 3.5 servings per can. That's 70mg of sodium per can. How many 8oz cans do you use to make spaghetti sauce? Four (280mg of sodium)? Five (350mg of sodium)? For a big party? Ten (700mg of sodium)? Twenty (1,400mg of sodium)?

Read this article from the Mayo Clinic on how the food industry deceives every one of us with labels like "no sodium," "low sodium," or "salt-free." Learn other names companies use to disguise the "s" word. The article even shares with you tips on how to cut down on your sodium intake.

After tasting this completely can free, preservative free, SODIUM free meal, I was absolutely astounded at the amount of sodium that is in one can and how little it actually appears to be. I dare you to make this recipe and see for yourself.


Farmer's Spaghetti with "Noodles"

Spaghetti Sauce:
Prep Time: 15 minutes
Cook Time: 1 hour and 5 minutes

Total Time: 1 hour and 20 minutes

"Noodles":
Prep Time: 2 minutes
Cook Time: 35-40 minutes (depending on size of spaghetti squash)

Total Time: 37-42 minutes


Makes 8-10 servings


Ingredients
Sauce:
2 tbsp olive oil
1 celery stalk
1 carrot
10-12 gloves garlic
1/2 yellow onion
salt/pepper to taste
8 tomatoes
1/2 cup vegetable broth
1/4 cup fresh basil
1/2 zucchini
1/2 yellow squash
1 bell pepper
tray of mushrooms

"Noodles"
1 spaghetti squash


Directions
"Noodles":
Preheat oven to 375 degrees. Very carefully, split open the spaghetti squash length wise.


Remove the seeds. You can save the seeds and make something like this.


Stick in the oven at 375 degrees rind side up for 35-40 minutes, depending on the size of the squash. 


Remove from the oven and let cool. Grab a fork and pull downwards towards the stem. The "noodles" will peel off and appear as angel hair pasta.


Spaghetti Sauce:
In a medium saucepan, add olive oil. Add and saute celery, carrot, and onion on medium high heat for about five minutes. Add half the garlic.


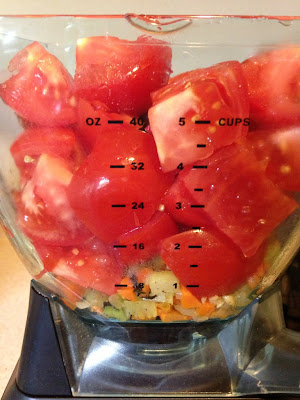
Dice tomatoes and add to the food processor. Finish sauteing veggies and add to the food processor. Puree. 

If you have a small food processor and require two rounds of pureeing (like me), add basil and 1/2 cup of vegetable broth with your second round. If you can fit everything into the food processor in one round, add basil and 1/2 cup of vegetable broth then.


After pureeing, add to a pot. Cover and cook for 25 minutes on medium heat.


Dice yellow squash and zucchini. Saute in saucepan with 1 tbsp of olive oil on medium high heat. After vegetables begin to break down, after about five minutes, add green bell pepper, the rest of the garlic, 1/2 yellow onion, salt and pepper to taste. Cook for three minutes. Add mushrooms. Cook for two minutes. Add the veggie mix to the tomato puree and cook, covered, for 30 minutes, stirring occasionally.


Make your plate! Put some "noodles" on your plate then top with the spaghetti sauce!


***Besides the fresh taste of all the veggies, the first thing I noticed was how UN-salty this spaghetti was! So here I am once again daring you to try this recipe so you yourself can taste just how sodium filled our canned foods have become. Taste the difference!!


DIY Puppet Theater

On this rainy day, we decided to make a puppet theater! With all these boxes from Amazon we've been getting, we were bound to find at least one suitable enough to make this day just right! This quick and easy solution to a rainy day will keep your kids busy for hours! Our next project? Puppets!!


Puppet Theater

Supplies
cardboard box
box cutter or knife
ruler
pencil
tape
paint
curtains (not shown)

Directions
With a ruler and pencil, draw window to cut.


Cut out window. I couldn't find our box cutter so I had to use a knife. Be careful!


Cut a straight line down the backside and horizontally at the top and bottom. You now have your basic puppet theater. 


Now it's time to decorate!!


Drying took the longest..."Is it ready yet? Is it ready yet?? Is it ready yet???"


We will be adding the curtains the next time we make a trip out to Wal-Mart :)


Thursday, July 25, 2013

The Perfect Pair

What goes together better than peanut butter and jelly...or hot cocoa and marshmellows...or butter and toast...or ...okay you get the idea...how about the BEACH and PIZZA?! A match made in heaven. Today, instead of take-out, we made our own. Yes, we cheated a little bit. The sauce isn't "homemade" and the pizza dough isn't either...but does organic count?

Today the kids and I took an excursion out to 'Onekahakaha for some salt water therapy. I'm all about pictures, but the big kids were so excited to be at the beach that they went straight for the water and never came back (until their tummies started growling and the camera HAD to be put away to tend to their needs). I did get to snap one of the Littlest and I though :)


..............................................................


Sunkissed Homemade Pizza
*named for that after-the-beach look

Prep Time: 12 minutes
Cook Time: 16 minutes

Total Time: 28 minutes


Makes 1 14in pizza


Ingredients
1/2 bunch spinach
4 cloves garlic
half a small bag mushrooms
1 cup fresh basil
1/4 red onion
can of pizza sauce
mozzarella cheese

Pizza Crust:
one box Chebe Pizza Crust Mix
2 tbsp olive oil
2 large eggs
1/4 water or milk


Directions
Preheat oven to 450 degrees. Cut and prepare veggies. Shred cheese. Following directions on box, prepare your dough.


Spread pizza sauce over dough.


Add cheese and veggies.


Stick in the oven at 450 degrees for about 16 minutes.


The kids really enjoyed watching the dough rise! Remove from the oven, cut, and enjoy!!


Wednesday, July 24, 2013

Christmas in July!!

Don't you love getting unexpected packages in the mail? I'm an Amazon freak, so I was already expecting two packages, but I had one extra package waiting for me at the post office! I get home, get the kids settled and excitedly open it. It's our first shipment of curriculum!!!!! We ordered Atelier Level 2 for our oldest. Then...surprise, surprise I hear a truck pull up and a double honk. Could it be?? Annnnother package for me??? TWO of them, actually! I felt like a kid at Christmas. I knew it just had to be more curriculum. I open the two boxes and one box contains our social studies curriculum, Houghton Mifflin Harcourt's A Child's View and HMH's Science Fusion.


Now that we've begun receiving curriculum, I can now start to utilize my planner! I am playing around with a few ideas right now, but I have to thank Erica from COAH once again for her brilliance. Tonight I'm working on marking off the upcoming school year's holidays so I can work around them. Once I receive all the curriculum, I can start filling in the daily work. For now, I'll have to settle with "Planning to Plan" as Erica states in her book, Homeschooling 101. I have to say that this book really helped minimize the stress into deciding whether or not homeschooling was right for us. Every single question that I had about homeschooling, from lesson planning to teaching more than one grade, was answered in this book. If you are considering homeschooling, or know someone who is, I'd highly recommend reading her book and subscribing to her blog

Anyone interested in learning more about the curriculum we've selected, I have added links to their websites below:

Atelier Level 2: Atelier Level 2
Houghton Mifflin Harcourt: Houghton Mifflin Harcourt Social Studies and Science


Not only did I get the mattress we ordered for our Littlest, but I got the cookbook I ordered, too!!


Forks Over Knives The Cookbook

.................................................

Last, but certainly not least, I leave you with yet another recipe. This is more of a fun smoothie that can be frozen into a creamy ice cream treat. I have to remind you (again) that I'm getting rid of all this "junk" food and while this may possibly be one of the most difficult things for me to give up, I have to share it lol.


ChocoNut Banana Shake

Prep Time: 1 minute
Cook Time: 30 seconds

Total Time: 1 minute and 30 seconds


Makes 4 9oz cups


Ingredients
16oz organic milk (or almond milk)
4 bananas
1 1/2 tbsp peanut butter
1 1/2 tbsp nutella
5 ice cubes


Directions
Pour milk into blender. Add bananas, peanut butter, nutella, and ice cubes. Blend and enjoy as a smoothie, or stick in the freezer for an hour and a half or so if you can wait that long. Just until it starts to freeze so it stays nice and creamy.


I'm sorry, but for this recipe I don't have a finished picture! The kids and I whacked it before I had the chance to snap a photo! Better luck next time, or you could just make it yourself and really see where it's at :)


Tuesday, July 23, 2013

Mama's Homemade Chocolate Chip Cookies

Do you remember how good mom's homemade chocolate chip cookies were? Mmmmm...chocolately and fresh out of the oven. Let me take you back to those warm memories of mom in the kitchen baking your favorite cookies. These are the most heavenly chocolate chip cookies I've tasted and will bring you back to your dining room table when you were a kid, impatiently waiting for mom to hand you a fresh homemade cookie.


Mama's Homemade Chocolate Chip Cookies

Prep Time:  8 minutes
Cook Time: 14 minutes

Total Time:  22 minutes

Makes 45 cookies

Ingredients 
7 tbsp butter
1/4 brown sugar
1/4 white sugar
1 egg
1 tsp vanilla
1 1/2 cups baking mix
1 cup semi sweet chocolate chips


Directions
Preheat oven to 350 degrees. In a large mixing bowl, combine butter, brown sugar, and white sugar. Mix with a hand held mixer until ingredients mix well.


Luckily, I had these two helpers with me today :) After mixing for a minute or so, add the egg and vanilla. After mixing for another minute, your combined ingredients should look like this:


Add in baking mix and chocolate chips. Mix with handheld mixer for about two minutes or until all ingredients combine into a thick dough. 


Using either a teaspoon or a mini scooper, made one inch balls with the dough.


Place each ball on your baking sheet about two inches apart. I was able to fit 20 balls on my baking sheet. 


Stick into the oven at 350 degrees for 14 minutes.


Let the cookies cool for about 10 minutes (if you can wait hehe). And there you have it! Mama's homemade chocolate chip cookies that your kids can love and enjoy as much as you did.


**I just wanted to add that the ingredients are not all organic. If you notice, the white sugar, vanilla, and eggs are non organic. I don't want to waste what I already have in my pantry, so as soon as those ingredients are out, I will be replacing them with organic. 


Love these recipes? Have a favorite one you'd like to share? Like, comment, or follow me!


Monday, July 22, 2013

Savory Dinner Puffs and the BEST Veggie Lasagna You'll Ever Taste

Today was such an awesome day! The kids and I headed to town early in the morning to get our grocery shopping done. I have to say, this trip to the Whole Food store was much quicker (and easier with the kids) because I'm learning where everything is. Tonight's dinner menu was vegetarian lasagna and savory dinner puffs-I nailed it!! Find the recipe and pictures below. We stopped at the post office and picked up our mail. Surprise, surprise, it was an envelop from our pals for our coin exchange from Wales!!


..........................................................


Arts N Crafts!!


Quick and Easy Bird Feeder

Today we decided to make bird feeders! It was fun, quick, and easy and not only do the kids love making them, they love the fact that we are "taking care of the birds." So cute :)

Here's what you'll need:


*bird seed
*peanut butter
*toilet paper/paper towel roll
*bin or something to hold the bird seed
*hole puncher
*string

All we did was punch holes in the rolls, put peanut butter on the rolls, roll it in the bin full of bird seed, and tie some string to the holes, then hang! There you have it! Bird feeders!!


....................................................


Dinner was AMAZING!!!!!!!! I've been waiting all evening to post this lol!! Remember those pancake puffs from yesterday's blog? I recreated the puffs into savory dinner puffs. I made garlic, basil, and mushroom puffs, garlic and spinach puffs, and garlic, basil, mushroom, and spinach puffs. Holy moly..I wish you could have smelled the aroma when they were baking in the oven. Heavenly! Here's the side dish to our Hilo Veggie Lasagna...


Savory Dinner Puffs

Prep Time: 8 minutes
Cook Time: 30 minutes
Total Time: 38 minutes

Makes 24 puffs

Ingredients
2 1/2 cups 100% whole grain baking mix
1 1/2 cups organic milk (or almond milk)
2 eggs
8-10 garlic cloves, chopped
bunch of basil, chopped
6-8 large leaves of spinach, chopped
6 mushrooms, chopped
*can use any veggies you love


Directions
Preheat the oven to 350 degrees. In a large mixing bowl, combine whole grain baking mix, milk, eggs. Mix until consistency is smooth and there are no dry spots. 

Chop up garlic, basil, spinach, and mushrooms.


Add garlic to batter mixture. If you want to make different flavors, I suggest pouring some of the batter into a separate bowl and adding your ingredients separately. The snap shot below contains garlic, basil, and mushrooms.


Spray your cupcake pan with cooking spray or wipe with vegetable oil to prevent the puffs from sticking. With a tablespoon, spoon about two scoops into each cupcake pan. Make sure not to fill more than half way so your puffs wont rise too high.


Stick in the oven for 30 minutes at 350 degrees.


After 30 minutes, remove the savory dinner puffs and stick a toothpick in the center of one puff to test the readiness. If it sticks to the toothpick, place the pan back into the oven for one to two minute intervals until the toothpick comes out clean. The edges and top of the puff should be golden brown.


.....................................................


Hilo Veggie Lasagna

Prep Time: 30 minutes
Cook Time: 1 hour and 45 minutes
Total Time: 2 hours and 15 minutes

Serves 8-10

Get ready for the absolute best vegetarian lasagna you will ever taste!!

Ingredients
1 1/2 pounds of mushrooms
1 medium yellow onion
1 green bell pepper
4 tbsp olive oil
8 cloves garlic
1 cup tomato sauce
1 6 oz can tomato paste
6 large tomatoes (pulsed in food processor, do not puree)
1/2 cup vegetable broth (optional)
spinach, chopped 
1 lb lasagna noodles
15 oz ricotta cheese
1/2 cup basil
1 lb mozzarella cheese, shredded


Directions
In a large skillet, add mushrooms and olive oil on medium high heat. When you see the juices flowing out of the mushrooms, add onions and green bell pepper.


Cook mushrooms, onions, and bell pepper for about five minutes. Add garlic. After about a minute, add tomato paste. Add tomato sauce. Add pulsed tomato (do not puree, you are looking for the consistency equalled to can crushed tomatoes). Add half cup of vegetable broth (optional). Bring to a boil, then reduce heat to a low simmer for about 20 minutes. Preheat oven to 350 degrees.


Once sauce is simmering, cook lasagna noodles. Follow the directions on the package. Turn off the heat for the sauce. In a large mixing bowl, combine ricotta cheese, half of the shredded mozzarella, and spinach.


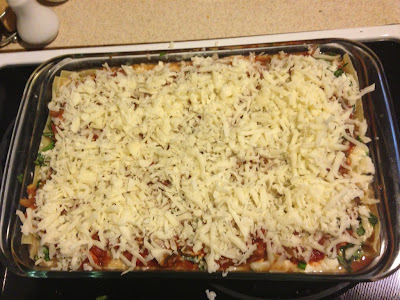
In a large casserole dish, put a layer of cooked mushroom sauce. Add layer of noodles. Add layer of ricotta mix (half of mixture). Add another layer of mushroom sauce. Add layer of noodles. Add layer of ricotta mix (other half of mixture). Add another layer of mushroom sauce. Add final layer of noodles. Add a layer of chopped basil. Add final layer of mushroom sauce and finish off the top with remaining shredded mozzarella cheese. 


Cover casserole with foil (put olive oil on the foil where it make contact with the cheese so it wont stick) and stick in the oven for 25 minutes.


After 25 minutes, remove foil. Stick back into oven and bake uncovered for another 25 minutes. Take the lasagna out of the oven when it's done and let it rest for 10 minutes before cutting to serve.


Enjoy!!!